By Kelvin Luu
Introduction
We use photographs constantly in cultural heritage work whether to capture a visual record of processes and conditions, objects and features, or a range of other forms of documentation. In many cases we’re aiming to accurately record what we are seeing and white balance and color calibration are essential to this process. The brief guide below will help you prepare before you start photographing as well as steps for batching post-processing adjustments.
Setting up
We’ll first introduce adjusting the white balance while you are taking your photos, and then we’ll move on to adjusting white balance and color balance in post with Adobe Lightroom Classic.
To start, well you will need a camera – in particular, one that can shoot in RAW! For white balance you want a white color card and/or an 18% neutral gray card. For color correction, you will want a color card. This tutorial assumes you will be using a Colorchecker (Passport, Mini, etc.) for color correction (the DAL has these available for use – email to be added to the equipment reservation system if you aren’t already). Make sure to bring these with you to wherever you are shooting!
For best results, make sure also that all of your images are being saved in RAW.
Camera custom white balance
You will want to adjust your camera’s white balance every time the lighting you are taking your photos in changes. If you are shooting indoors, it will probably be fine to set it once and then forget about it. Note: You don’t have to get everything perfectly accurate while shooting: if the final results are a bit off it can most likely be edited in post.
The details for setting the white balance will differ depending on the camera model, but the general procedure will be fairly similar.
- Go into the camera settings and look for the White Balance adjustment setting.
- There should be an option for setting a custom white balance. Select it and follow the instructions. Usually, it will either prompt you to take a photo of your white card (the gray card works also), or to select a photo you have already taken of it in the correct conditions.
- Save and select the custom white balance.
If you are prompted to select a photo of your card, make sure that your image is properly exposed (for example, by checking that the meter measurement is 0). If the white card is overexposed (completely white), your white balance will be off. Some people recommend using the gray card as it is harder to overexpose.
If you are prompted to take a photo of your card, the camera should automatically choose the exposure properly. This is fairly camera specific, so it is probably best to set the exposure properly in any case.
Take a photo of your white card and gray card in the lighting conditions you will be shooting your objects in (and if you are using the Colorchecker, you should take a picture of the color grid as well). Provided that your images are properly exposed, there should not be any issue in adjusting shutter speed or aperture size. The resulting white balance will not be affected much if at all from this (in-camera and in post). Adjusting ISO will also not affect your white balance very much.
In some sense, these settings (shutter speed, aperture, ISO) affect the brightness of your shots, while white balance has more to do with the color cast your lighting tints your photo with. As long as there is enough light going into the lens (i.e. the image is properly exposed), the correction in white balance needed to account for this should not change provided your lighting (or your position relative to the lighting) does not.
You should also make sure that these images don’t have shadows over the cards. If you are shooting top-down, it is best that you find a way to take your photos without hovering over your camera and subject. Any shadow over the cards can lead to a change in the white balance setting, especially since there can be already be a fair amount of variability with how bright regions of any individual card are relative to each other.
And be sure to hold on to these photographs as well. That way, if you make any mistakes, or if the final results aren’t ideal, you can more easily edit your images in post.
Post processing
We will be using Lightroom Classic for our post processing. In particular, the one whose icon is “LrC”, not “Lr”! Photoshop’s Camera Raw can work as well, but Lightroom has some features that make the workflow more efficient.
UCLA Students and Faculty have access to a free Adobe subscription (follow the instructions here).
Setup
If you are using the Colorchecker Passport, you will want to download the Colorchecker Camera Calibration software – scroll down on this page. Make sure to include the Lightroom plugin with the installation!
You will want to have transferred all of the RAW image files onto your computer. It will be easiest to have all of your images from a single session stored in one folder. Subfolders for sorting are fine, but they should be inside that top level session folder.
The following procedure assumes that your images are all taken in same lighting. If you have images taken in different lighting conditions, you can sort the images into batches based on this and then apply the steps to each batch of images individually.
After opening up Lightroom Classic, you will want to create a new
Catalog to work with the images you have taken. You can do this by
navigating through File > New Catalog and selecting
an appropriate folder and file name to save the .lrcat file
in. After doing this, the Lightroom screen will direct you to import
your photos by clicking the Import… button in the left column. If you
don’t see the button, make sure that you’ve selected the “Library” tab
in the upper right.
In the popup window, navigate to and select the relevant folder containing a batch of your images. You can do this by clicking through the file tree there, but it will probably be easiest to just drag and drop the folder you need into the center column.
If you have subfolders, you will want to check the “Include Subfolders” checkbox in the left column (above the filetree dropdown). Select all of the images with the “Check All” button near the bottom of the center column (making sure that you are including the image of the Colorchecker and/or the white/gray cards).
Then click Import in the bottom right. Don’t click Done!
All of your images should appear in Lightroom now.
Adjusting white balance (post)
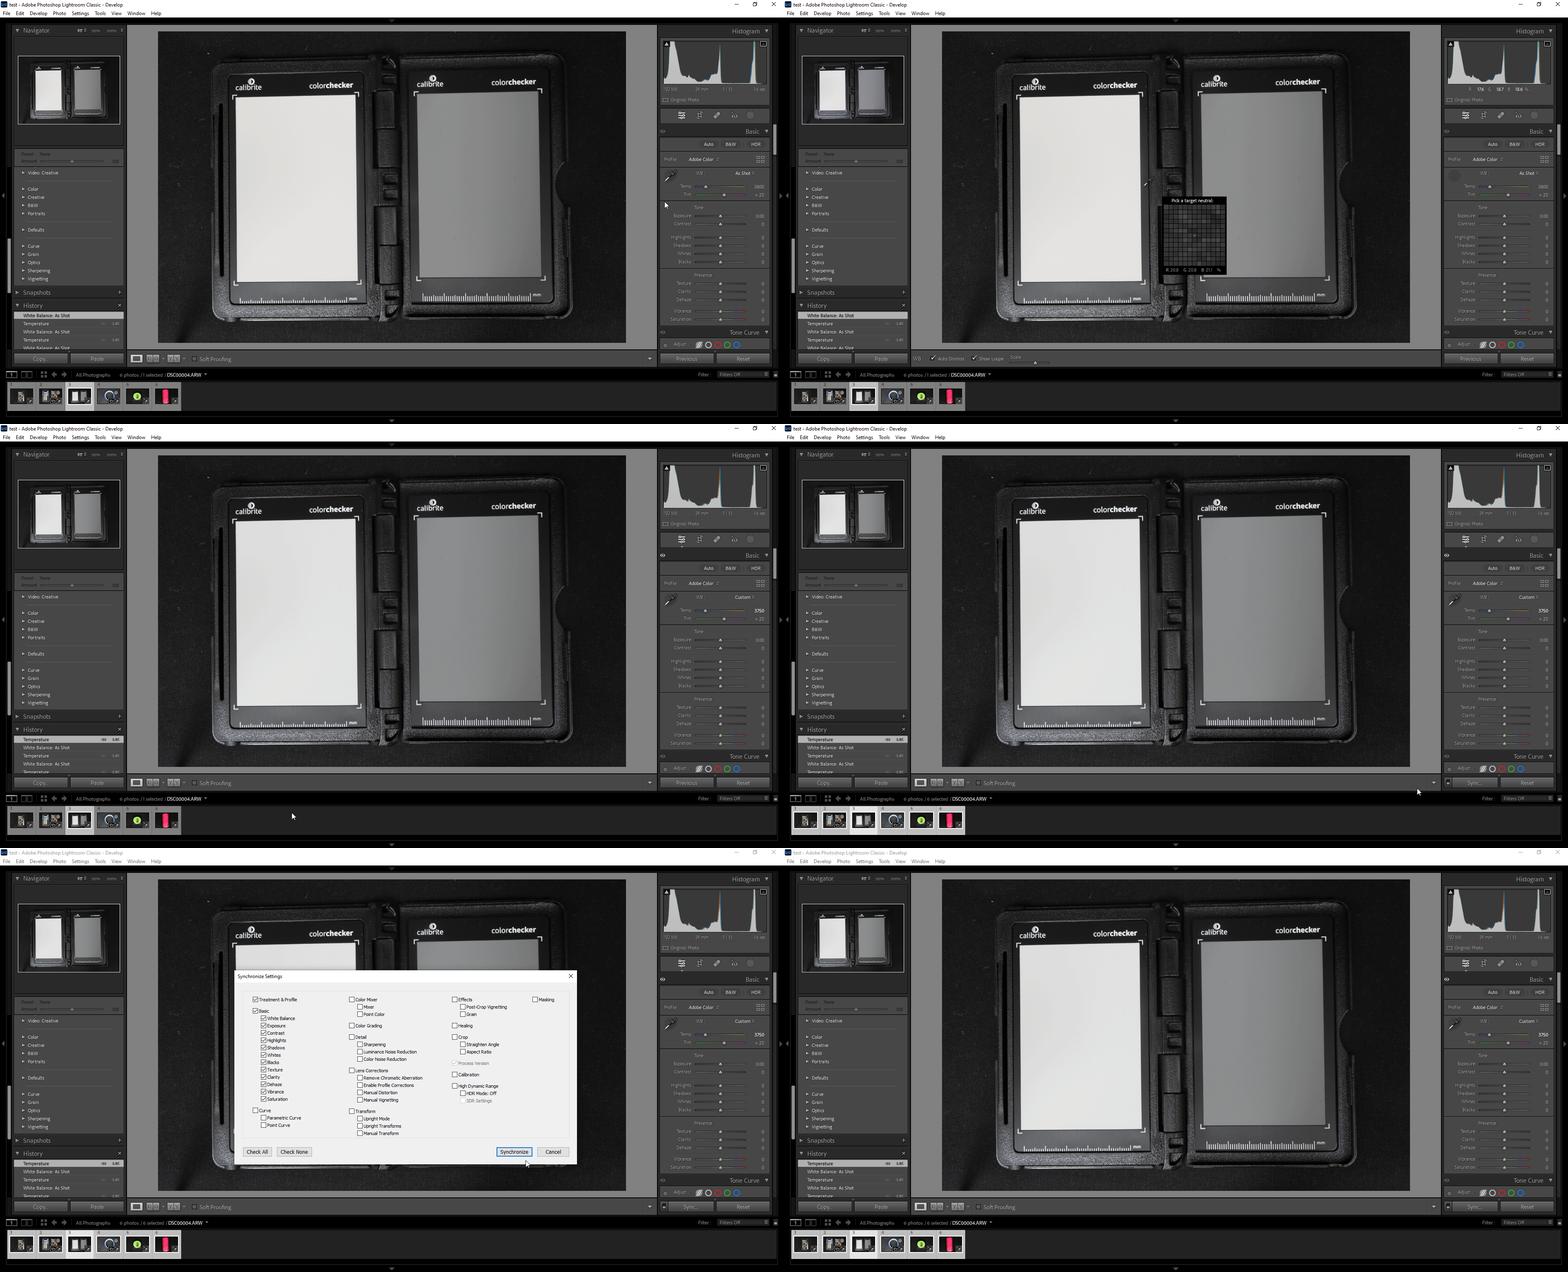
Click on the image of your white or gray card in the bottom reel or in the central grid to select it. It should not matter which of the two cards you select for this. However, Lightroom may refuse to select the white balance from the white card if the pixels are too close to being 100% white. In this case, you can click on the gray card to select the white balance.
Once this is done, click on the dropper in the Basic tab and then click on the white or gray from the card. The white balance should be properly adjusted at this point.
To apply it to all of your images, first select all of the images in the image reel (via Ctrl/Cmd-A, Shift/Ctrl left clicking, etc.). Then, click again on the image that you selected the profile for earlier. The highlight around the image of the card should be brighter than the rest.

If you don’t do this, some other photo will be selected and its settings will be applied. In the right column, click the Sync… button (this button will only appear if you have more than one image selected in the reel, so if you don’t see it, reselect the images).
In the dialog window that appears, make sure that you check “Basic > White Balance” and then hit Synchronize.
Color correction (post)
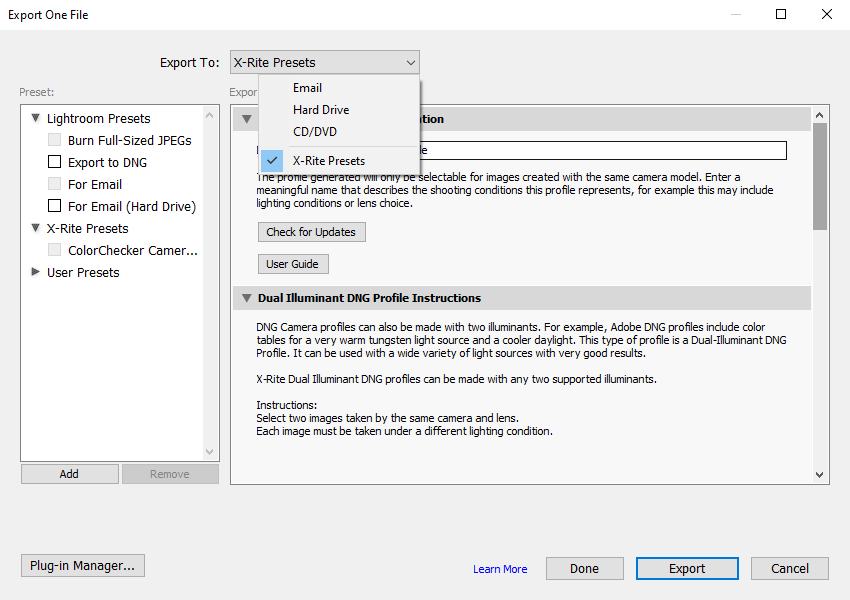
If you are using the Colorchecker, click on your image of it from the bottom reel or from the central grid to select it. Then, navigate through File > Export. In the pop-up window, besides “Export To:” at the very top, click on the dropdown box. If there is an item in the list labeled “X-Rite Presets” then you are good to go. If not, there are some more steps to get the plugin working.

If “X-Rite Presets” doesn’t show up, first, make sure that you have installed the Colorchecker software with the Lightroom Classic plugin. If you did install it, you can follow the instructions here to manually add the plugin to Lightroom.
Note: On Windows, AppData is a hidden folder. If you want to navigate to it in the dialog, you should copy and paste the path
C:\Users\UserName\AppData\Roaming\Adobe\Lightroom\Modulesinto the top navigator bar (the long bar besides the search bar).
If you can’t find the required
.lrpluginfolder inAdobe/Lightroom/Modules, redownloading the software should work.
Once you are done, refollow the instructions in the above paragraph to get to the export dialog. “X-Rite Presets” should be an available choice from the dropdown box.
Select “X-Rite Presets”. You should enter a non-default name in the box for “DNG Profile Name” under “ColorChecker Camera Calibration” so that you can find it once it’s saved. Then click Export. Note: It may take a while for the profile to be created.
When it is completed, a pop-up will appear telling you to restart Lightroom. There is no need to “Save”, you can just close and reopen Lightroom.
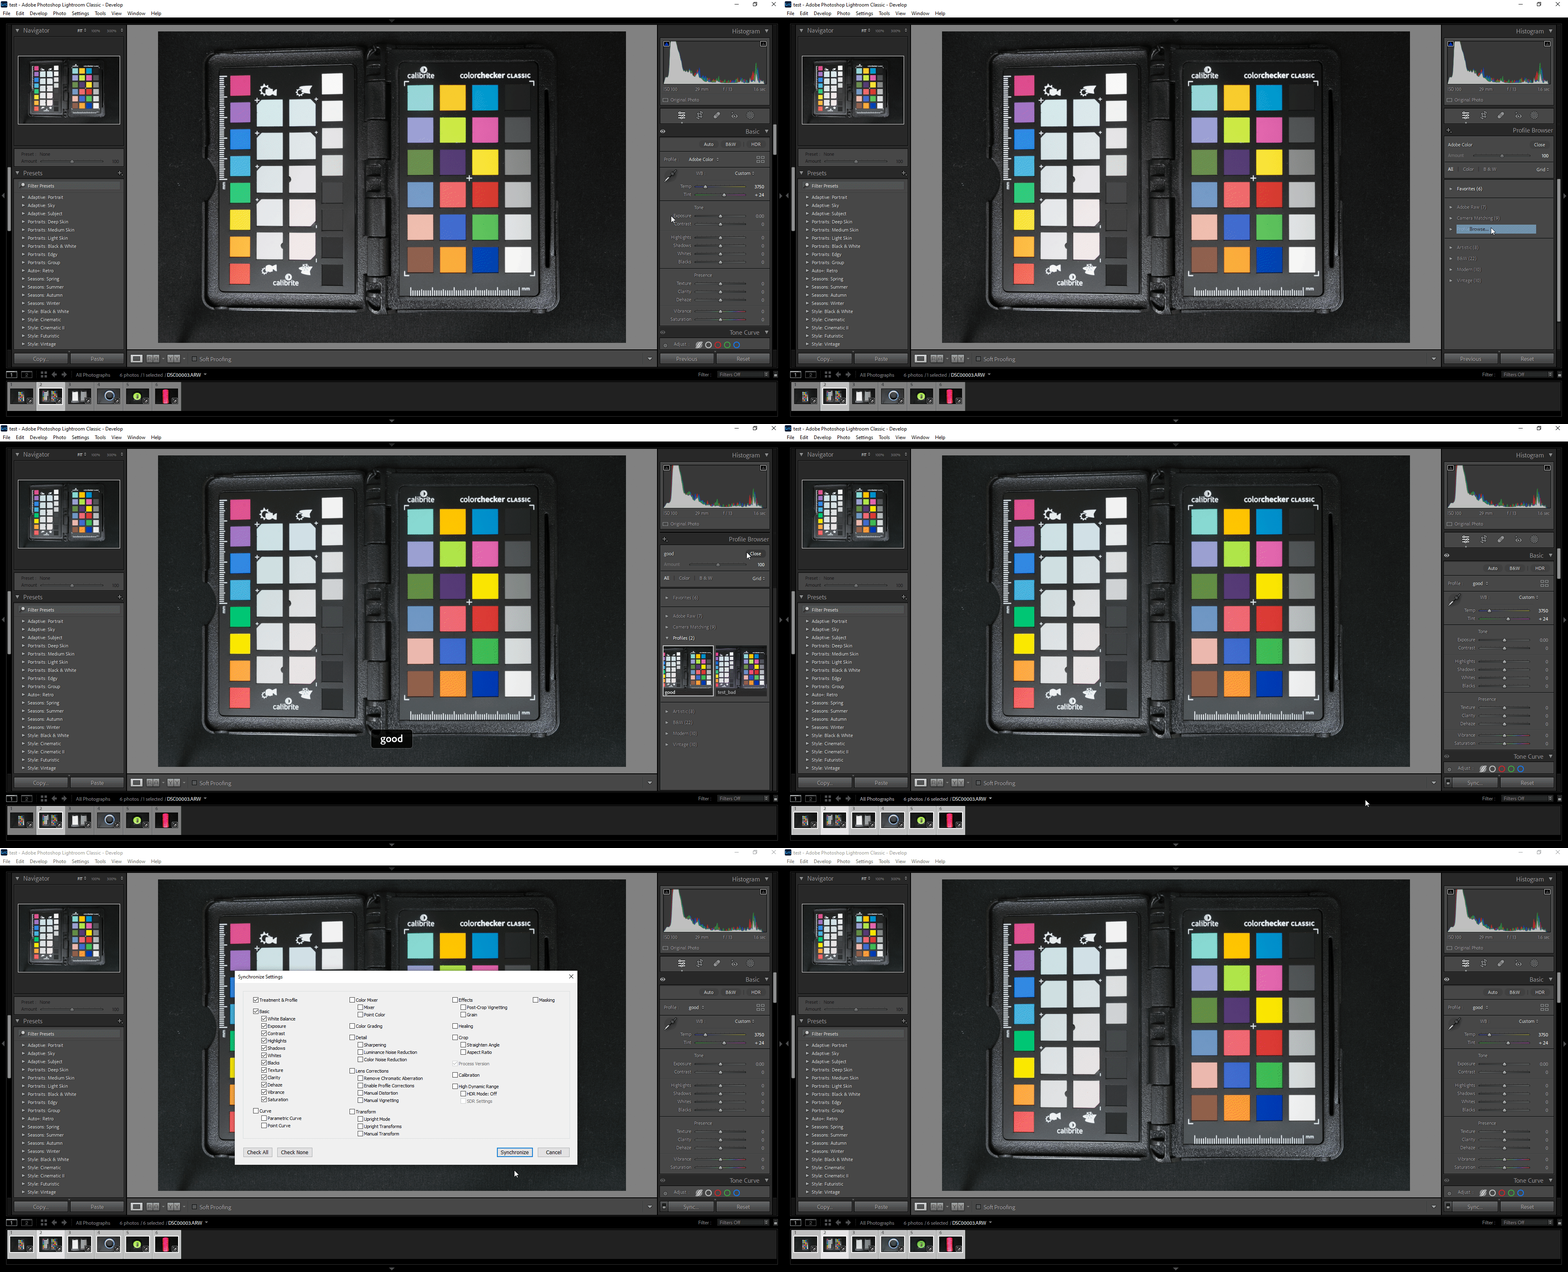
Once Lightroom is open again, switch to the Develop module by clicking “Develop” in the upper right (you might need to click the triangle at the very top of the Lightroom screen to reveal it). Select any of the images in the bottom reel. In the right hand column, under the “Basic” tab, click on the dropdown besides “Profile:” and then select “Browse”. This should open up a “Profile Browser”. Scroll down and click on “Profiles (#):” and then select the profile that you saved earlier.
This should apply the changes to the image that you selected. To apply it to all of them, you can follow the instructions above for white balance, but be sure to check “Treatment & Profiles” before hitting Synchronize.

That’s it! We recommend testing (and practicing) the process prior to going into the field or a situation where you have limited time or more challenging conditions.
