This is a continuation of a previous post detailing our investigation of thresholding as a means to silhouette our images. In this post, we will see if using a contemporary machine learning model for image segmentation will yield better results.
Introduction
With the thresholding being prone to fairly disappointing results, a colleague recommended that we look into Meta/Facebook’s machine learning Segment Anything model, which is thankfully open source. We ideally did not want to rely on a program that could be taken down or otherwise become unusable. We want to be able to do this long-term, so this being open gave us more confidence in its sustainability.
Setup
The README for the repo is fairly detailed about getting dependencies and the actual model installed. The steps are fairly standard aside from also needing to download a separate “model checkpoint”. The three checkpoints are named after the size of the “Vision Transformer” variant used in the model, Base, Large, or Huge. I used the default ViT_H checkpoint and didn’t notice any issues, but it may be worthwhile to try the Base or Large models to speed up processing, but this will be at the expense of accuracy.
Running the Model
I adopted the code from the predictor_example.ipynb
example notebook provided by Segment Anything.
First, we load in the packages and the Segment Anything model:
import numpy as np
import torch
import matplotlib.pyplot as plt
import cv2

import sys
sys.path.append("..")
from segment_anything import sam_model_registry, SamPredictor

sam_checkpoint = "sam_vit_h_4b8939.pth"
model_type = "vit_h"

device = "cuda"

sam = sam_model_registry[model_type](checkpoint=sam_checkpoint)
sam.to(device=device)

predictor = SamPredictor(sam)
Make sure that the sam_checkpoint path lies in your
working directory!
Eagle-eyed readers will note the line device = "cuda". I
am unsure whether or not a CUDA enabled GPU is required to run the
model, but I did use one when working with Segment Anything.
As before, we load in the images.
image = iio.imread(uri='path/to/image')To work with the image, we first need to tell the model what image we want to segment, and then feed it a point “prompt” to determine what it segments out:
predictor.set_image(image)

# choose point "prompt(s)" to determine what should be masked over
# by default take the center pixel of the image; might need to change if the object isn't centered
points = np.array([[image.shape[1]//2, image.shape[0]//2]]) # [column, row]!
labels = np.array([1])
You can add more points to the array to refine the prompt and mask you get by adding new rows to the points ndarray. The labels should be assigned correspondingly, with 1 being for inclusion, and 0 for exclusion.
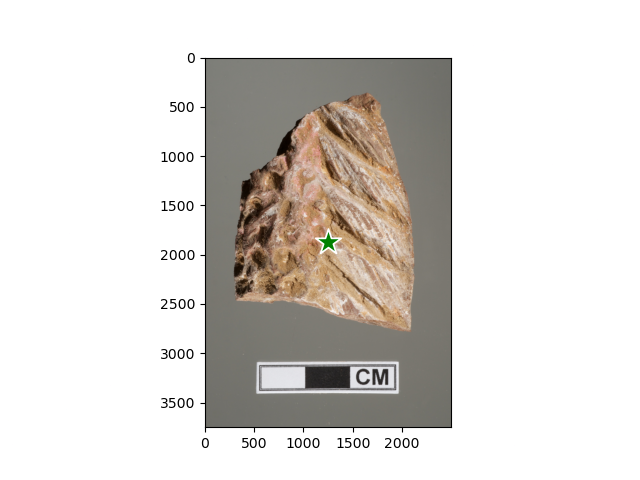
I just used the center pixel of the image, under the assumption that the object will almost always be centered in the picture. There may be better ways of automatically choosing a good prompting point, but I couldn’t think of any. If the mask is off, you can try adding extra guiding points or change the points to improve the results. For example, here is the point selected for one of our images:

With the prompt points, we can use the model to make our predictions.
masks, scores, logits = predictor.predict(
    point_coords=points,
    point_labels=labels,
    multimask_output=True,
)
The masks array gives out multiple possible masks for
the image based on the prompt. We sort these by their corresponding
score in the scores array and pick the best out of all of
them.
# get the best mask and its score
masks_sorted = sorted(enumerate(masks), key = lambda x: scores[x[0]], reverse = True)
index, best_mask_sa = masks_sorted[0]
best_score = scores[index]
print(f"best score: {best_score}")
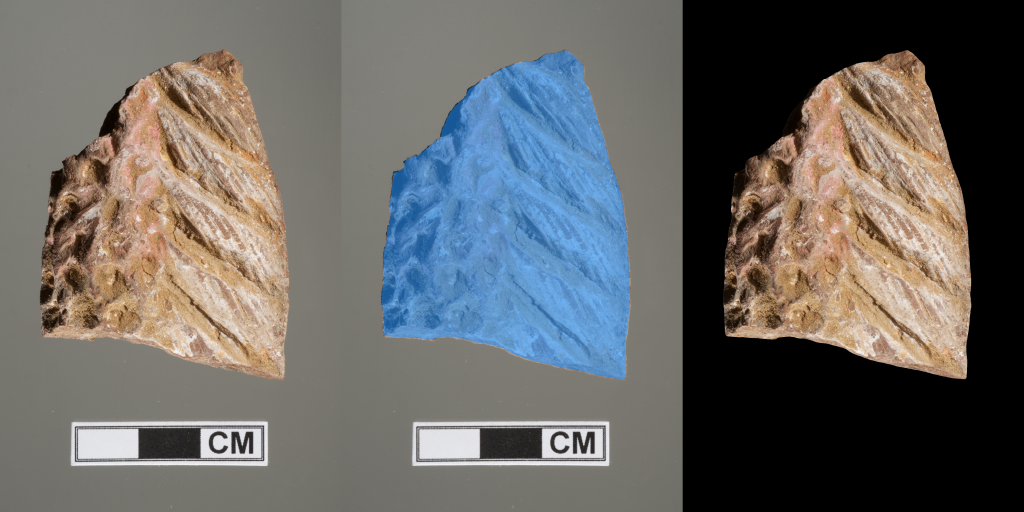
Here are some of the results:


This identifies the object very well, and is a definite improvement over the thresholding algorithm! It is only missing a couple of pixels on the border and tends to avoid sharp corners and rough edges.
Adding more points didn’t seem to improve this, but doing some image processing on the result seems to be promising. We try to add these pixels back into the mask with image dilation:
# dilate the image (add buffer pixels on edge):
dilated_mask = ski.morphology.binary_dilation(best_mask_sa, ski.morphology.square(10))
We use the ski.morphology.square(10) argument to add to
the mask a 10 pixel square centered around every pixel selected in the
mask beforehand (i.e. those with value 1). The 10 pixel value should be
adjusted depending on the size of your images to make sure that the
dilation doesn’t add in too many pixels from the background. You may
also want to test which shape of the “footprint” for the added pixels
works the best. [You can define your own, or look at the skimage.morphology
documentation for some other built-ins.]
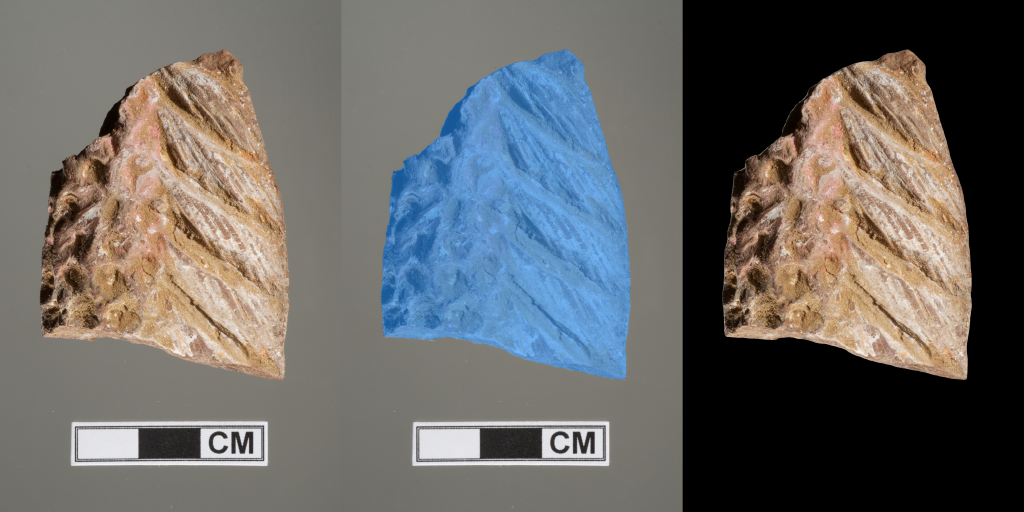
After saving the images as before, this is what the final processed images look like:


The masks capture more of the object at the edges, although it still misses a bit, especially where there are sharper corners. The dilation definitely added in more of the background pixels (there is a bit more of an outline around the objects now!), so this method is not perfect. The best choices for footprint and size of dilation may also vary image by image, so this may not be particularly ideal for batching.
Regardless, the results are impressive!
Limitations for Batching
Besides the issue with the boundary and the choice of dilation footprint/size, the choice of the “prompt” point can be a problem. The code I used assumes that the object is centered in the image, and more importantly, that Segment Anything will actually grab the entire object with just that prompt. Since it is a machine learning model, it is a bit unclear what the outcome of any given prompt will be. It is possible that our prompt selects only a part of the object, and that we need to add more prompt points to improve the mask to select the whole. Further testing is needed to see in what situations this is needed.
For Further Research
There are many other ML models for segmentation that may be useful to look into, for example, Mask R-CNN which does not require any special “prompting”.
It may also be worthwhile to try doing some further training (via transfer learning) on these models with our own images and masks to get better results. (In particular, to get better identification at the edges!) However, doing this will need a large amount of images with their masks already created (and a lot of processing power and time), so this is something we leave for the future.
