Introduction
One of the questions we get periodically in the Digital Archaeology Lab is around photographing artifacts and silhouetting the objects (aka removing the background so that you have an image of just the object that can then be used in publications or presentations). In most cases, this process has been done manually using software like Adobe Photoshop or GIMP to digitally draw a mask over the object and then deleting the background pixels. However, this does not scale and there has always been this nagging thought of shouldn’t technology be able to do this for us by now? The Carpentries team published a workshop on image processing that reignited this thought and showed some possibilities for ecological data. Yet we know that the range of materials, composition, conditions, and a host of other factors when working with artifacts would complicate automating any kind of batch process – that’s part of the fun of cultural heritage work right? With this in mind, the DAL Research Intern Kelvin Luu dug into the image processing techniques described in the Carpentries workshop and explored other options.
We first looked into creating masks that identify the object in the picture using thresholding algorithms (in particular, Otsu’s method) following the above workshop article.
Thresholding
Binary thresholding algorithms sort each pixel in an image into two classes by computing a threshold value that we use to determine which group a pixel belongs to. This threshold only makes sense after converting the image to grayscale and working with pixel intensities, i.e. their levels of brightness. Otsu’s method is one particular algorithm for obtaining this threshold.
Applying Otsu’s method
The thresholding procedure we used is roughly as follows:
- First, read in the image and convert it to grayscale.
- Then, blur the image with a Gaussian filter.
- Apply Otsu’s method to obtain the pixel intensity threshold t.
- Construct a boolean mask by comparing the values of each pixel in the grayscale image to the threshold t.
- Zero out all pixels of the original image outside (or inside) the mask, and save it.
Here is the code for that:
import imageio.v3 as iio
import skimage as ski
import numpy as np

# Step 1:
image = iio.imread(uri='path/to/image')
gray = ski.color.rgb2gray(image)

# Step 2:
blur = ski.filters.gaussian(gray, sigma=1.)

# Step 3:
t = ski.filters.threshold_otsu(blur)

# Step 4:
# Flip the inequality to select pixels darker than the threshold
# i.e. if the object is darker than the background
mask = blur > t

# Step 5:
selection = image.copy()
selection[~mask] = 0 # zero out pixels NOT in mask
iio.imwrite(uri='output/path', image=selection, extension='.png')
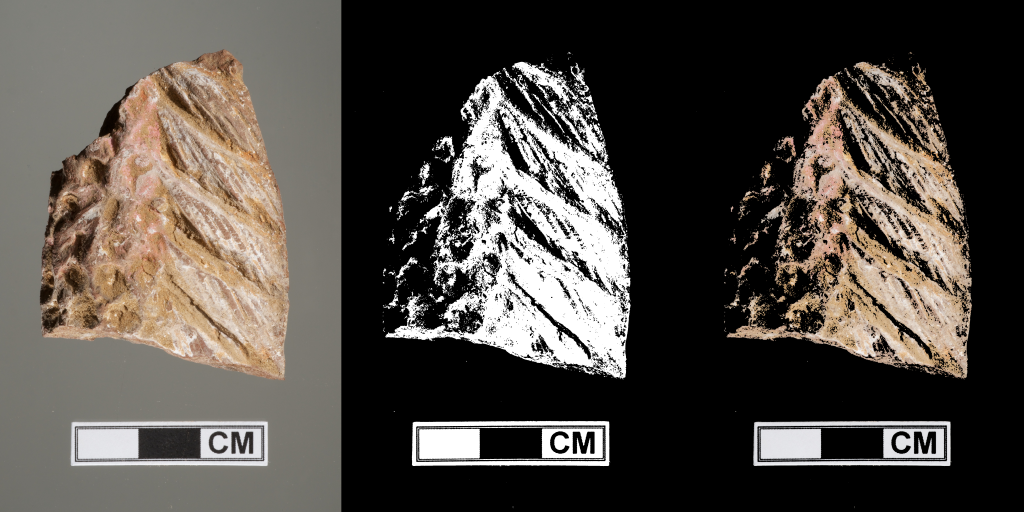
And here are some of the results:


They are… not stellar. The first two images were processed with minimal defect, but the remaining two have a large portion of the foreground eaten up into the background. The most fundamental issue here is the use case of Otsu’s method for thresholding. Otsu’s method works best when the pixel intensities (i.e. the pixel brightness as determined by the grayscale conversion) are different between classes, but similar within classes. In particular, the foreground pixels should have a similar intensity to each other, as should the background pixels, but a foreground pixel should be much brighter (or darker) than a background pixel (and vice versa).
While it is not too difficult to find a uniform background to take images over, we cannot expect the same from the foreground object in general. Some issues, like the shadows cast on rough objects, can be resolved by adjusting the lighting and other details when taking the image, but others are more inherent to the object itself. We can at least mitigate a couple of these issues.
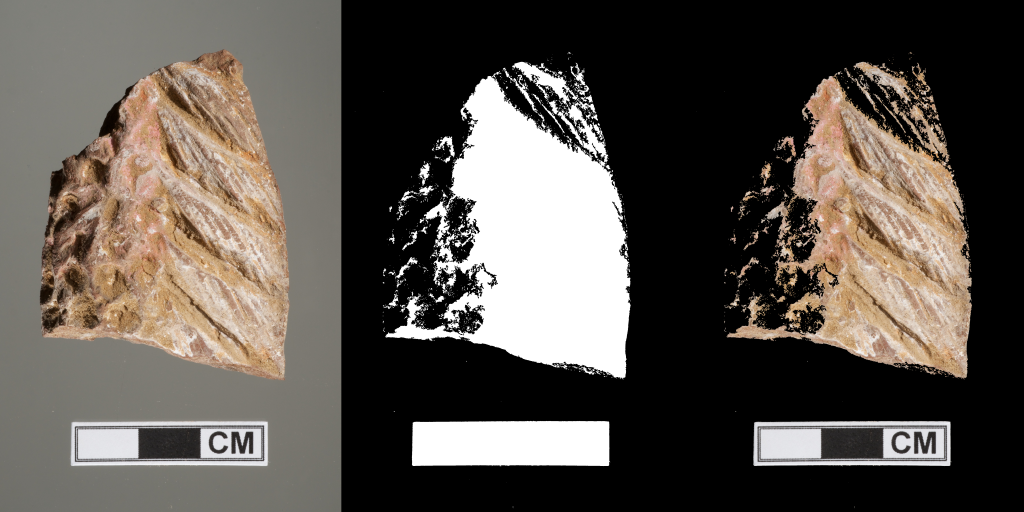
For objects whose masks have holes in them (a spot of 0’s otherwise surrounded by 1’s), either because there are dark areas in interior of the object surrounded by light ones, or light areas surrounded by dark ones, we can try to alleviate this by removing the hole. In particular, this adds back in pixels that were identified as the background instead of the foreground:
Removing small holes
Scikit-image provides a nice function for doing this:
# compute the number of pixels identified to the object
ones = np.count_nonzero(mask)

# remove holes (contiguous "blob" of 0's) from mask of size less than
# number of pixels of the object
holes_removed_mask = ski.morphology.remove_small_holes(mask, ones)

selection_HR = image.copy()
selection_HR[~holes_removed_mask] = 0
iio.imwrite(uri='output/path', image=selection_HR, encoding='.png')
We use the np.count_nonzero function to determine the
number of pixels corresponding to the foreground object and use it as an
upper bound for the size of a hole that is removed. This is done under
the assumption that there will be more background pixels than foreground
pixels (i.e. the foreground object takes up comparatively less space in
the picture than the background) so that the background won’t be deemed
a hole and removed. (This is a potential problem when it comes to doing
this in batches).


The results are a lot better than before! But, you will notice that many of the foreground pixels are still incorrectly identified as background. These remain after hole removal because they are connected to the main background “chunk”. In some sense, this means that our problem is reduced to performing accurate edge detection on our objects, but this remains for further research.
Summary and Ideal Implementation Details
If you want to try using this on your own photos there are a couple of things to keep in mind. The most important, of course, is that you take pictures of your objects over backgrounds as different in brightness from the object as you can. The grayscale conversion algorithm uses a formula designed to reflect how human eyes perceive brightness, so to some extent you can just use your eyes to determine relative brightness. In general, I found that I achieved the best results with black backgrounds for lighter objects, and white backgrounds for darker ones. You should also try to minimize shadows by lighting the object as evenly as you can. In particular, if you are using a light background, try to make sure shadows aren’t being cast onto it.
As with the above, a major issue is that objects are not necessarily homogeneous in brightness! With hole removal we ideally only need the edges of the object to be relatively homogeneous, but this still is not always possible. If your object is a bit spotty, you may be able to rotate and reorient the object in the picture so that a particularly bright/dark spot is not lying on the boundary and “touching” the background of a similar color.
Finally, we save the images as .png (.tiff
also works!) because .jpg has a nasty habit of creating
artifacts on the edges of the final image.
Limitations
As stated before, transparent objects like glass will not work well with this method (although slightly more opaque objects can have ok results). The background “leaks” through the object and makes it hard for the thresholding algorithm to identify. It may be possible to use this with objects that are tinted; this is something to be tested in the future.
There are also a few issues with trying to perform this in batches:
Hole removal is not a “one-size-fits-all” solution. For one thing, some objects naturally have (literal) holes in them that we don’t want to remove! We have also made an assumption that your image contains “more” background than foreground. There is a chance that hole removal will make the resulting mask worse.
Similarly, the code above hard codes in that the object is lighter than the background. This is not always the case. It may be helpful to split images into light and dark groups, and run one variant for each group respectively. (In particular, the inequality we use when defining the mask based on the threshold in Step 3 should be flipped depending on the use case.)
Potential Solutions and Other Approaches
It may be possible to set the max hole size dynamically by choosing the smaller value between the number of foreground/background pixels identified on a first pass of mask creation.
It may also be worthwhile to try variations of Otsu’s method like the iterative triclass method.
There are also segmentation methods that avoid using thresholds entirely, and therefore may avoid some of the pitfalls we encountered here. We have already mentioned doing edge detection. Watershed and clustering methods may also be fruitful.
More recently, many machine learning models have been created for segmentation tasks. We look into Meta’s Segment Anything model in the next part.
